Building intuitive and engaging (customer, developer, user, visual) experiences is my Ikigai.
Why?
I want to try out hacking the Linux Kernel in weird ways and I want to make sure I am able to build it before changing bits and parts of it and experimenting.
I don't have a spare machine to do this stuff. Neither have I worked with Qemu or other emulation platforms to know what's happening with my kernel.
I'm not brave enough (yet) to install this "god knows what bugs it has" kernel on my only working machine to test things out.
I've been using WSL2 for a while to write code and build things, but I found that it also gives me a safe way to try a new or modified kernel and an emergency switch to the stable kernel if things go wrong, all while being able to interact with my computer and write code on it. Seems legit, so let's build it.
Please note that you need WSL2 to continue with the rest of the process. More info here .
Building the Kernel
The README.md file of the WSL2-Linux-Kernel repository gives us 2 commands to build the kernel on an Ubuntu machine.
Personally, I had to jump through little hoops before I could successfully build the kernel. So, here goes nothing.
Steps to Build the Kernel
Building On:
Platform: WSL2
Distro: Ubuntu-20.04
Edition: Windows 10 Home
Build Number: 19043.1348
1. Clone the Kernel Repository
If your aim is to just build the kernel and you are not planning to hack on it yet, you can directly shallow clone the microsoft/WSL2-Linux-Kernel repository.
git clone --depth 1 https://github.com/microsoft/WSL2-Linux-Kernel.git
If you are planning to hack on the kernel yourself and do some other stuff, it would be wise to fork the repository and then clone your fork.
git clone --depth 1 https://github.com/sampathbalivada/WSL2-Linux-Kernel.git
Here, I do not wish to have the git history locally so I am choosing to shallow clone, if you want the history, you can remove the --depth option.
2. Installing Tools
Kernels don't build (in other words, compile) by themselves. They need a compiler and other tools to build. For that, the repository README asks us to run the below command, so let's run it.
sudo apt install build-essential flex bison libssl-dev libelf-dev
While building the kernel, I encountered an error that required pahole, let's look into it at a later point as our primary goal now is to build the kernel.
Upon further research, I was able to determine that pahole is a part of the dwarves package. So, let's install it as well.
sudo apt install dwarves
Now, we have all the tools needed to build the kernel.
3. Summon the Makefile
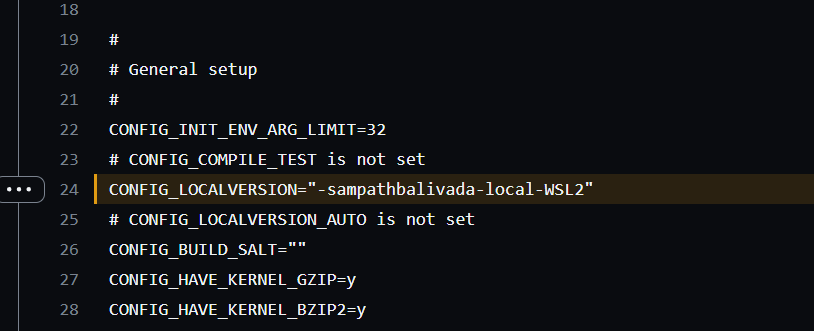
Before we initiate the build, we may want to create an identity for ourselves using the version string.
So, let's modify the version
File: WSL2-Linux-Kernel/Microsoft/config-wsl
All set. Now, let's build our own kernel for WSL2.
make KCONFIG_CONFIG=Microsoft/config-wsl -j4
-j4 creates 4 parallel tasks for building the kernel. You may choose to increase or decrease the number 4 as per your liking but the thumb rule is that you create 4 parallel tasks if your PC has 4 cores and so on.
4. Build finished. What next?
So you are done with the 10-15 minute build process and would like to move on to using this kernel that you built.
A quick ls in the WSL2-Linux-Kernel directory will reveal that we now have a new file name vmlinux. That's the kernel we just built.
Now, let's move it to a location on the Windows Machine. I moved it to C:\Users\<username>\. You may move it to any location of your liking.
Now comes the neat part. Telling WSL to use our Kernel instead of the default one. How do we do it? Through a configuration file.
WSL allows us to specify global settings for all the distros using the .wslconfig file located at %USERPROFILE%\.wslconfig.
This is how I configured my .wslconfig file.
File Name: %USERPROFILE%\.wslconfig or C:\Users\<username>\.wslconfig
[wsl2]
kernel=C:\\Users\\sampathbalivada\\vmlinux
We now need to restart the WSL Virtual Machine for it to pick up the new configuration file and also use the kernel we built.
Open a new PowerShell window and type the following command to shut down all the running WSL2 VMs. Make sure to save your work before shutting down.
wsl --shutdown
Now open a new Ubuntu or your favourite distro terminal and type in the below command.
cat /proc/version
You should be greeted with your custom version name. It indicates that WSL is now running a kernel that's built by you. Phew!
Linux version 5.10.74.3-sampathbalivada-local-WSL2+
What's next?
In future blog posts, I will try to understand and elaborate on the different subsystems in Linux and how they work in cohesion with each other. We will also see if we can change some stuff in the kernel and play with it.
![Scalability, Reliability and Maintainability [Tenglish]](/_next/image?url=https%3A%2F%2Fcdn.hashnode.com%2Fres%2Fhashnode%2Fimage%2Fupload%2Fv1759079554176%2F86761c98-abd6-4c0a-a763-cb7578149542.png&w=3840&q=75)